How Do You Make Pop Out Cards / How To Make Pop Up Cards Aunt Annie S Crafts : Open the card that you just cut, so you can see the slits.
Dapatkan link
Facebook
X
Pinterest
Email
Aplikasi Lainnya
How Do You Make Pop Out Cards / How To Make Pop Up Cards Aunt Annie S Crafts : Open the card that you just cut, so you can see the slits.. I like using a metal one, in case i want to use it for cutting as well as scoring (the knife will cut a plastic ruler and. Make another of the same length above it. You don't need to measure anything, but you do need to make straight score lines. Pick another piece of cardstock to serve as the body of the card. This is what the recipient will open in order to see the pop up design.
Make another of the same length above it. Mountain folds look like the top of a mountain, and valley folds look like the bottom of a v — like a valley. How to have fun with paper and kill bore. Open up the card and bend the new fold forward, making it pop out. Here's how to make the basic parts of a pop up box card.subscribe for weekly craft videos!
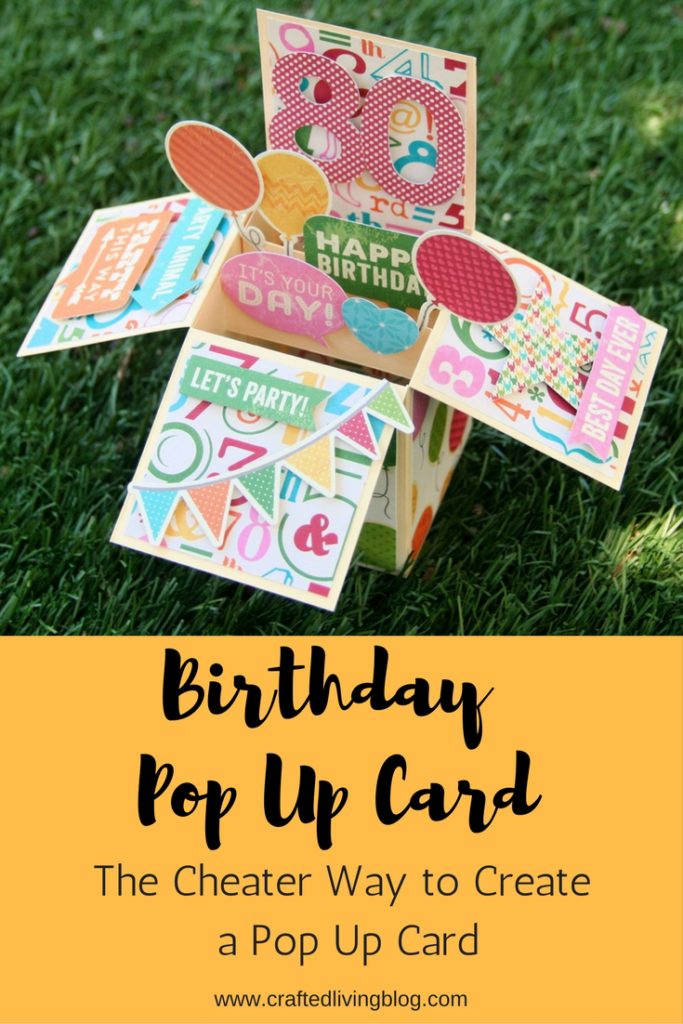
Birthday Pop Up Box Card Crafted Living from www.craftedlivingblog.com This is what the recipient will open in order to see the pop up design. You can also make a smaller card by cutting the paper into a smaller size. How to have fun with paper and kill bore. Now you or your kids can give your favorite people a virtual hug by making and. Make sure not to put glue on the top of the step, just the front edge. Whether you're celebrating a birthday, holiday, or milestone, this funny card is sure to put a smile on everyone's face. Make another of the same length above it. Cuts don't need to be straight lines, but they must go from valley fold, across a mountain top, to the next valley fold.
Now you can glue anything you want to the space that pops out.
Cuts don't need to be straight lines, but they must go from valley fold, across a mountain top, to the next valley fold. Create the inside elements for your card—the pieces that will pop up. 2 select a piece of cardstock for the base of the card. They are great for any occasion. Open the card that you just cut, so you can see the slits. Open up the card and bend the new fold forward, making it pop out. Print or draw your pop up art. Now you or your kids can give your favorite people a virtual hug by making and. You don't need to measure anything, but you do need to make straight score lines. The first step in creating a pop up card is to create the outer part of the card. Make sure the inside elements you create won't hang off the edge of your card once it's closed. This is what the recipient will open in order to see the pop up design. Now you can glue anything you want to the space that pops out.
They are great for any occasion. Cuts don't need to be straight lines, but they must go from valley fold, across a mountain top, to the next valley fold. Make the first cut about 1 inch from the bottom of the card. For more crafting inspiration, techniques, prizes, and chat visit. Open up the card, poke the sections you.
Diy Pop Up Cards For Any Occasion from www.thesprucecrafts.com 2 select a piece of cardstock for the base of the card. Now you can glue anything you want to the space that pops out. Open the card that you just cut, so you can see the slits. Choose what will go on each tab—you can either print the images we provided or draw your own. Whether you're celebrating a birthday, holiday, or milestone, this funny card is sure to put a smile on everyone's face. This is what the recipient will open in order to see the pop up design. For more crafting inspiration, techniques, prizes, and chat visit. Make sure that out of all your large background rectangles, the largest of the 4 is at the back of your card, as this keeps this side of the card up whilst the others fall down.
To do this, simply take a piece of construction paper or card stock, and fold the paper in half.
Cuts don't need to be straight lines, but they must go from valley fold, across a mountain top, to the next valley fold. Make another of the same length above it. To do this, simply take a piece of construction paper or card stock, and fold the paper in half. Pick another piece of cardstock to serve as the body of the card. For more crafting inspiration, techniques, prizes, and chat visit. Whether you're celebrating a birthday, holiday, or milestone, this funny card is sure to put a smile on everyone's face. You don't need to measure anything, but you do need to make straight score lines. Run your fingers along the fold of the card so that it's firmly creased. Create the inside elements for your card—the pieces that will pop up. Materials you need you can see & buy on my blog: Open the card and push the tab out. This is what the recipient will open in order to see the pop up design. Make sure not to put glue on the top of the step, just the front edge.
Pick another piece of cardstock to serve as the body of the card. The first step in creating a pop up card is to create the outer part of the card. How to have fun with paper and kill bore. The last two cuts will be 1 inch long. Print or draw your pop up art.
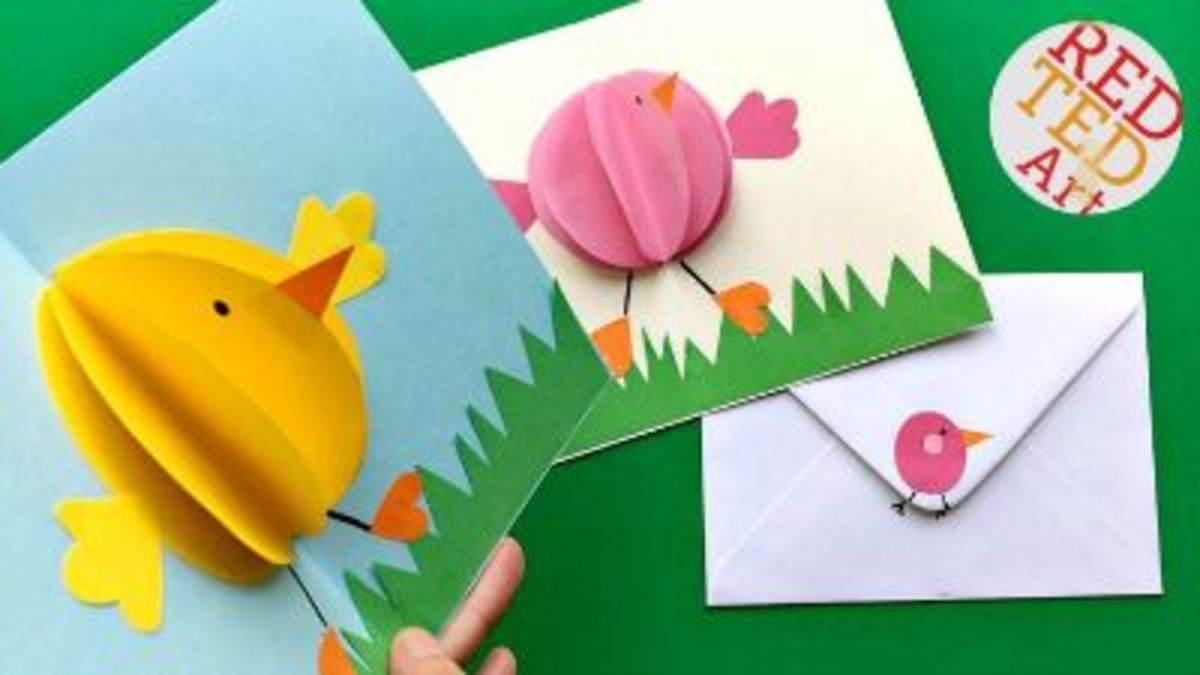
37 Diy Ideas For Making Pop Up Cards Feltmagnet from images.saymedia-content.com Use your fingers to gently push the tab section up towards you. Mountain folds look like the top of a mountain, and valley folds look like the bottom of a v — like a valley. How to have fun with paper and kill bore. Now you or your kids can give your favorite people a virtual hug by making and. 2 select a piece of cardstock for the base of the card. Make another of the same length above it. Print or draw your pop up art. The last two cuts will be 1 inch long.
The first step in creating a pop up card is to create the outer part of the card.
For more crafting inspiration, techniques, prizes, and chat visit. Use your fingers to gently push the tab section up towards you. Make sure the inside elements you create won't hang off the edge of your card once it's closed. How to have fun with paper and kill bore. Run your fingers along the fold of the card so that it's firmly creased. Now you can glue anything you want to the space that pops out. 2 select a piece of cardstock for the base of the card. I like using a metal one, in case i want to use it for cutting as well as scoring (the knife will cut a plastic ruler and. Materials you need you can see & buy on my blog: Cut the pop up art out and use a glue stick to secure to each tab. Choose what will go on each tab—you can either print the images we provided or draw your own. You don't need to measure anything, but you do need to make straight score lines. Now you or your kids can give your favorite people a virtual hug by making and.
Jadi secara sederhana penyusutan adalah nilai manfaat yang kita peroleh selama … 18.09.2019 · definisi dari penyusutan yang juga dikenal dengan istilah depresiasi adalah suatu proses akuntansi untuk mengalokasikan biaya aktiva tetap ke beban dengan cara sistematis dan rasional selama periode tertentu yang diharapkan mendapat manfaat dari penggunaan aktiva tersebut. Berapa depresiasinya dan nilai buku pada akhir tahun kedua jika mobil tersebut mempunyai nilai sisa rp. Penyusutan tahun pajak 2019 = 12,5% x rp30.000.000 = rp3.750.000. Wajib pajak harus cermat menghitung pajak atas sewa, ini alasannya. Tukar Mobil Lama Dengan Unit Baru di Garasi.id - Garasi.id from s.garasi.id Wajib pajak harus cermat menghitung pajak atas sewa, ini alasannya. Nah, pada kesempatan kali ini, mari kita bahas lebih dalam … Keduanya yakni biaya tetap dan biaya var...
What Do Cancer Mean In Dreams / 6 Most Common Dreams and Their Meanings - BrandonGaille.com / This can result in tumors, damage to the immune system, and other impairment that can be fatal. . Cancer tumors in dreams represent a variety of unprocessed psychological and emotional materials that the dreamer may be obsessing on. Usually it reflects an emotional toxin that is eating away at you, growing, and it is helpful to notice the area of the body where the cancer is in your dream, as it may provide insight into the specific emotional issue. Cancer dream meaning, interpretation and dream symbolism. Inability to look at inner. When you dream of brain cancer, it means that you are harboring some unhealthy thoughts which could be taking over your serenity. Do not worry in advance, but if your guts tell you to see the. The news is full of reports about cancer risk, but what does it all mean for you? Are masks, empty streets and social distancing now simply a backdrop to ...
How Would U Know If U Had Lung Cancer : Smoking Kills Lung Cancer: Cigarettes Cause 11 Other Types ... / Know the signs and symptoms! . Genes control how your cells grow, divide, and die. A cough that does not go away or gets. How do you diagnose lung cancer? Test your knowledge with our simple quiz! Lung cancer may not produce any noticeable symptoms in the early stages, and many people aren't diagnosed until the disease has advanced. Lung cancer usually starts in the cells that line the inside of the lungs. If you have a parent, brother, or sister who's had lung cancer, you're two or three times more likely to get this cancer than someone without a family you may already know that genes are pieces of dna that carry the instructions your body needs to work. This article will explain what lung cancer is, how to recognize the symptoms, and the treatment options available. Lung cancer occurs when cells in the lung mutate or change, and most often this tob...
:max_bytes(150000):strip_icc()/porcupine-e58c44a6cd764c7885a7afa326348b2f.jpg)


Komentar
Posting Komentar